

Nowadays many users need to create a RADIO APP for their online radio station or with music playlists.
Mobincube offers this useful option and in this tutorial we will see how to create a Radio App and how to use some streaming providers to do that.
On the Internet we have thousands of online Radio Providers available which we can use in order to create a Radio in streaming.
Below we have some examples:
The second step is to record the content offline by using for example:
AUDIO FORMAT & PROTOCOLS
It is really important to remember the AUDIO FORMAT and the PROTOCOLS supported by Mobincube:
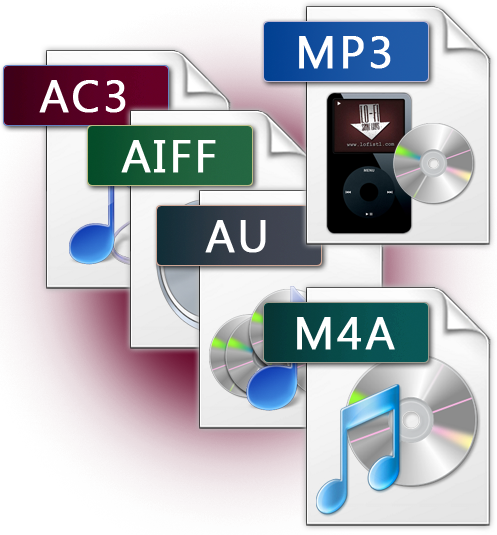
The FORMATS supported are: MP3 – AAC – Vorbis (H. 264/ VP8)
The PROTOCOLS supported are: Http – RTP (Real Time Protocol) and RTSP or Real Time Streaming Protocol (this last one is not supported by iOS, so make sure that you are using an HTTP protocol to make it is compatible with iOS).
MOBINCUBE AND STREAMING

Let’s see how to use each functionality in our Apps.
In Mobincube we have 3 ways to use audio in our Apps:
PLAYER
The Player action allows us to associate a URL to whatever element to be opened by the device's default audio player.

If we assign the action PLAYER to a button on our app, when the user will click on the button with the associated "player" action, our system will display a list with all multimedia applications associated to the audio streams. Here, we can choose one of them to play the audio file.
This works depending on the OS and player.
We can insert URLs like:
HTTP (with the streaming audio address)
RSTP (not supported by iOS)
PLAY & STOP
These actions allows us to open a local or streaming audio inside the App itself.
What we have to do is to insert the online resource, in a MP3 format, to the Play and Stop action and we will have to allow Mobincube to validate it, by opening the Resource Manager and uploading the audio streaming resource in there.

In case we have a playlist file with a different format, for example type txt. , we will have to use a trick to make it work. We can open this file in the Text editor and look for the mp3 file URL, compatible with the resource manager. We can copy and paste this content in the Resource Manager as Online resource and upload the file to play and stop action.
REACTION ON MINIMIZING OR CHANGING SCREEN
It is really important to know the different reactions of the App when using the different actions: Player or Play.
When we use the PLAY action, it will allow us to listen the audio in the background, even if we minimize or change the screen of the app.
To stop the audio we will have to use a STOP button or completely exit the App.
With the PLAYER action we can control the music and navigate the App without listening to the music in background. This means that, if we close or navigate the application, the audio will be switched off.
HOW TO CREATE A RADIO APP STEP BY STEP

Now let’s see, step by step, how to create a Radio App with Mobincube.
In the following example we will create a SPLASH screen as presentation of the Radio App which will send the users, in some milliseconds, to another screen (in our example to the Mainscreen).

In the Main screen we have inserted an HEADER, an IMAGE ELEMENT in the body of the screen and a MENU BAR with 4 ICONS.

We assigned an action to each icon:
INFO: we will assign to this icon the action: “go to screen” and, as a destination, the detail screen: “INFO”, as in the following image.

PLAY: we will assign to this icon the action: “go to screen” and, as a destination, the detail screen: “PLAY”, as in the following image.

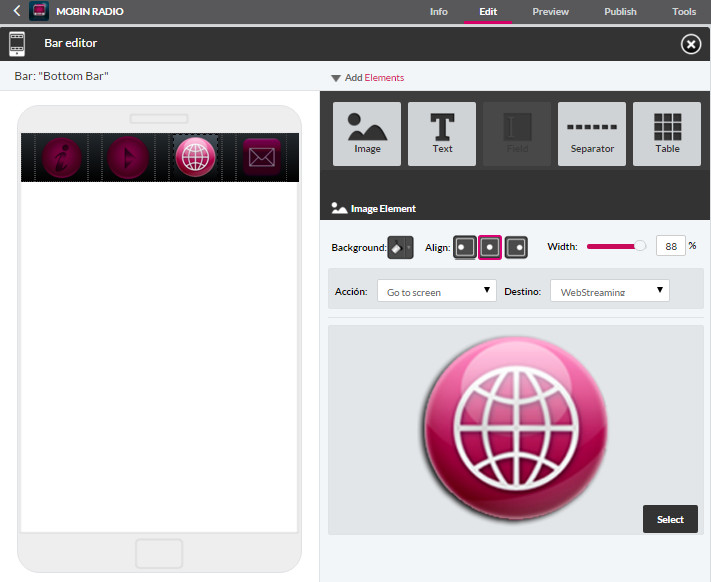
WEB: we will assign to this icon the action: “go to screen” and, as a destination, the web screen: “WebStreaming”, as in the following image.
CONTACT: we will assign to this icon the action: “open url” and as destination we will write the following script: mailto:[email]?subject=[subject]&body=[content]
(You must replace the email with the address at which you want to send the email, you can choose any subject. Same for the content, you can set a content by default if you write it, or let the user to write it. If you do not want a content by default just delete '&body='
Remember: you must remove the 'brackets'([]) from the string.)
In this way when the user will click on the button, they will be able to send an email, as in the following image.

We are now going to design the structure of the other 3 pages: INFO, PLAY, WebStreaming.
SCREEN INFO:
In the INFO screen we will insert the following:
1 Header image
1 Text element with the description of our Radio Channel
1 Menu bar
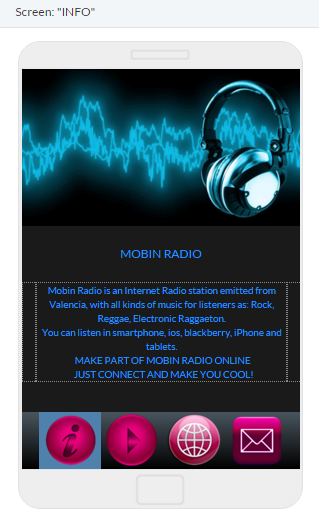
As you can see in the above image, we have the same menu bar of the Main screen, but this bar has a different color for the INFO icon. What we did is we cloned the main menu bar and insert a background color for the icon related to the screen we are using (in this case the INFO icon). So that the user will know that he is in the info screen (we will do the same for the other bars to drag to the other screens).
SCREEN PLAY:
We are now in the PLAY detail screen.
In the PLAY screen we will insert the following:
1 Header image
1 Table with 2 icons
1 Text element
1 Menu bar

We will assign an action to the 2 icons uploaded in the table:

We will assign the action “PLAY” to the Play button and following this we will upload an mp3 audio file from the Resource Manager.

We will assign the action “STOP” to the Stop button and following this we will upload the same mp3 audio file from the Resource Manager.

In this way the user will be able to reproduce the audio files uploaded and to stop it whenever they want.
In the following example we will see how to use the PLAYER action.
To link the screens of the app, we will assign the action: “go to screen” to the text element of the Play screen, and following this we will create a new detail screen: “PLAYER”, as in the following image.

SCREEN PLAYER:
We will open the PLAYER screen to design the structure.
In the PLAYER screen we will insert the following:
1 Header image
1 Image element in the center of the body of the screen
1 Menu bar

We will assign the action “PLAYER” to the image element, and following this we will insert the URL of the streaming of the Radio.

In this way, when the user will click on that button, the URL of the radio streaming will be opened from the multimedia applications of his device which are associated to the audio streams, and they can choose one of them to play the audio file.
SCREEN WEB:
Let’s see another functionality which allows us to embed the content of the Radio streaming in our App. We will use the Web Screen which embeds the content in the app, so that the users can listen to the music inside the app itself, without leaving the app.

In this screen we have dragged the Navigation Bar.
Now we can use 2 options:
1. Inserting the URL of the streaming, with the action Player. In this way, when the user has an internet connection, he will be able to listen to the streaming.
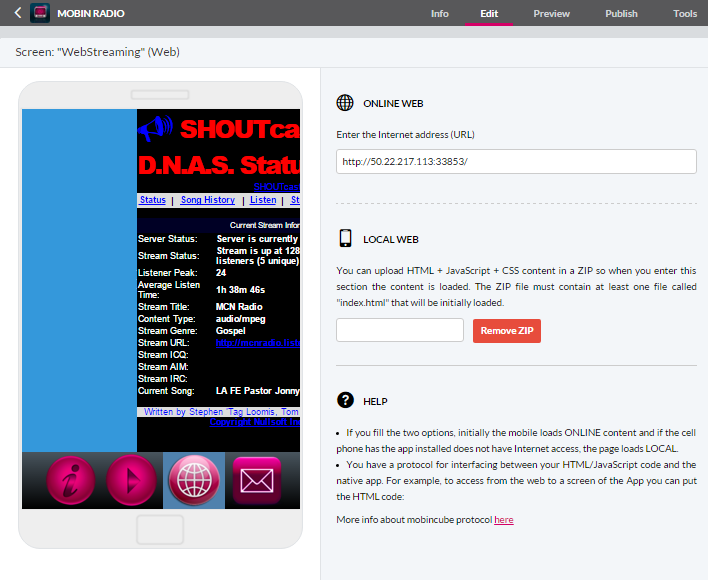
2. If we have the Code of a web Player, obtained from a web radio, we can paste the code into the body of an HTML and upload it inside a ZIP file to be able to navigate it while the device has no internet access.
The ZIP file must contain an index.html which the app will use to start the navigation of the web.

In this example we will copy the Player code from a web page:

Then we will open or create an index.html and we will paste the copied code into the body of the html, as in the following example:

Finally we will have to zip the file and upload the zip into the Web Screen.
WHEN YOU CREATE A RADIO APP YOU CAN USE ALL THE FUNCTIONALITIES LISTED ABOVE OR CHOOSE THE ONE WHICH SUITS YOUR NEEDS.
NOW CREATE YOUR OWN RADIO APP AND HAVE FUN!
More in : “How to create a radio App”